
Exploring Painted Frame Styles
Classic Molding-Inspired Frames
A wall paint frame in the classic molding-inspired style carries authority. It imitates the cornices and architraves of Victorian interiors without requiring a single piece of actual plaster. You paint the frame directly onto the wall surface, using a satin finish to catch light differently than the flat base colour. This visual approach gives a room dimensional structure.
- Choose a frame width proportional to the wall height.
- Limit the frame to one accent colour.
- Keep the inner wall area visibly lighter than the frame.
Proportion decides success. A thin frame on a tall wall looks insufficient. A thick frame in a narrow passage feels intrusive. Measure the wall, then select a width that holds its own. For South African homes with high ceilings, try a double frame with a narrow gap between layers. That gap produces a shadow line, adding depth with minimal effort. A correctly applied wall paint frame in this style reads as a built-in feature, not a decorative afterthought.
Modern Minimalist Border Designs
Minimalism does not mean empty walls. It means every line earns its place. A wall paint frame in the modern minimalist style uses proportion and colour to create boundaries without weight. Where classic styles add layers, this style subtracts.
South African interiors with open plan living areas respond well to sharp, geometric borders. I have seen a single frame at one third of the wall height turn a sprawling lounge into a composed space. It separates zones in one sweep, no screens or furniture required.
Matte finishes perform best here. They absorb light and keep the frame quiet, so the wall itself becomes the feature. Monochrome pairings, such as anthracite on soft white, carry more presence than pastel combinations.
Try these border placements:
- A thin rectangle running the full perimeter
- A single vertical band beside a doorway
- Two parallel lines spaced a hand’s width apart
The wall paint frame remains subtle, but the room gains an immediate sense of order. That is the whole point!
Faux Wood Grain Finishes
The most convincing faux wood grain on a wall paint frame never imitates sawn timber. It captures the character of living wood, the way light hits the grain in a Karoo morning. I have stood back from a freshly grained frame and found myself checking for the smell of sawdust. It is that convincing.
In South African homes, where sunlight fades furniture, the painted frame offers a stable alternative. The technique involves laying a tinted glaze over a base coat, then dragging a steel comb or a rubber rocker through the wet film. The result is a flowing, linear turbulence.
- The ‘runs’ create vertical grain.
- The ‘flames’ produce understated figure.
- The ‘wavy’ pass adds gentle movement.
This wall paint frame technique offers a distinct presence. It gives a room a tactile quality, a sense of material richness without the maintenance.
Farmhouse Shiplap Looks
Shiplap begins as plain boards, the kind that once formed the walls of old farmhouses. A wall paint frame can evoke that history without importing a single plank of timber. A base coat in bone or ash grey provides the ground, then fine horizontal lines are etched into the wet paint to mimic the gaps between boards.
The shadowed grooves create a rhythm across the wall, a quiet repetition that suggests order and age. The technique rewards patience; each line must be drawn before the paint begins to set, and the spacing must stay deliberate.
For the frame itself, the passes are simple:
- A wide brush lays the base.
- A straightedge scores the lines.
- A dry rag softens the edges.
This style suits rooms where light is low and the architecture feels heavy. The result is a painted border that feels lived in, marked by time.
Art Deco Geometric Edges
Nearly 40% of interior designers report a resurgence of Art Deco motifs in contemporary spaces. The style translates beautifully into a wall paint frame that trades soft curves for sharp, angular drama. Instead of flowing lines, you mark the perimeter with stepped edges and sunburst rays. Masking tape becomes your compass; a craft knife keeps the corners crisp.
A typical design sequence might follow a rhythm:
1. Measure equal segments along the frame edge.
2. Tape off parallel lines in a zigzag formation.
3. Paint in two contrasting tones, then remove the tape while the topcoat is still tacky.
Metallic accents, such as a bronze or brushed gold topcoat, heighten the geometric effect under South African sunlight. The finished wall paint frame feels deliberate, architectural, and distinctly modern.
Tools and Materials Needed
Choosing the Right Paintbrush for Clean Edges
A straight edge hardly earns praise, but a crooked one draws comments at every gathering. For a wall paint frame, the choice of brush is your main safeguard against such flaws. I prefer a 50 millimetre angled sash brush for long runs; it lets you lean into the cut without overshooting.
- An angled sash brush with synthetic bristles
- A smaller liner brush for corners and curves
- Low tack painter’s tape for protecting adjacent surfaces
Synthetic bristles move smoothly through latex and acrylic paints without leaving streaks. Natural bristles absorb water and swell, which leads to uneven application. The handle’s weight also matters. A heavier handle steadies the wrist, but only if it fits your grip. Testing it against your palm reveals any imbalance. This attention to ergonomics ensures your wall paint frame stays crisp from first stroke to last.
Painter’s Tape and Its Proper Application
A cheap roll of masking tape leaves a permanent shadow on a freshly painted wall paint frame. Its adhesive bleeds through the seam, costing you an afternoon of sanding. Choose a low tack painter’s tape. South African humidity alters adhesion, so store rolls in a cool dry spot.
Wipe the trim with a damp cloth and let it dry. Lay the tape along the edge, pressing with your finger. I use a putty knife to firm the tape into the previous paint layer, blocking capillary pull. Remove the tape while the topcoat is still wet, but after it sets enough to avoid drips. That timing is everything!
For a wall paint frame, the materials are simple:
- Low tack roll, 25 millimetres wide
- Angled brush for excess paint
- Sharp blade to score dried edges
Never leave tape longer than 24 hours.
Selecting a Durable Paint Sheen
A wall paint frame succeeds or fails before the brush ever touches the surface. That truth comes down to materials and the sheen you choose. Start with an acrylic primer, a fine filler for hairline cracks, and a quality sanding block. These three items prevent the most common failures, especially in South African coastal humidity.
- Acrylic primer for proper adhesion
- Fine surface filler to seal imperfections
- A 180 grit sanding block for smooth edges
For sheen, think about durability. A satin or eggshell finish resists scuffs and cleans well without reflecting every flaw. Semi-gloss works for the inner line of the frame, but flat paint will stain and mark within months. I always test the sheen on a spare board first. That small step saves a full repaint.
Measuring Tools for Symmetrical Layouts
A wall paint frame is only as true as the measurements that guide it. I have watched skilled hands ruin a clean design with a crooked line, so I trust tools over guesswork. For a symmetrical layout, the right equipment makes the difference between a balanced frame and a lopsided eyesore.
- A laser level for a stable horizontal reference
- A steel tape measure with etched markings
- A chalk line for snapping long vertical guides
- A 90 degree square for checking corners
The laser level projects a line across the entire wall, which is critical for a wall paint frame that must mirror itself on both sides. A fabric tape stretches and lies to you; steel does not. After marking each point, I step back and measure twice before committing to paint, because symmetry hides no errors.
Using Stencils and Rulers for Precision
A stencil needs a ruler the way a frame needs a straight edge. Skip one and the flaw travels the length of the design.
I tape acetate stencils to the wall using low tack adhesive. Then I run a clear acrylic ruler along the stencil’s outer edge. This gives my brush a hard stop instead of a guess. The ruler is not for measuring here. It is for restraint.
For shapes that repeat along the wall paint frame, I mark the stencil’s position with a pencil notch. This takes seconds and prevents drift.
- Align the stencil to the ruler edge each time.
- Check the gap with a spacer card.
- Tap the paint with a dry brush rather than stroking.
Acetate sheets outperform paper under Cape Town’s damp air. Paper ripples and bleeds. Acetate holds flat. The wall paint frame depends on that flatness.
Step-by-Step Painting Techniques
Creating a Base Coat Before Framing
A flawless wall paint frame often fails because the base coat was rushed. In my years of painting, I have learned that the initial primer layer is the essential act of preparation. It seals the porous plaster and smooths the tiny divots, so the final edges do not bleed or bubble.
This preparation follows a strict sequence that rewards patience. I keep to this order:
- Stir the primer slowly, digging to the bottom of the can, to release every pigment.
- Dip a 12 millimeter roller and work it back and forth on the tray to remove excess.
- Paint in a N pattern across the wall, then cross those lines with vertical sweeps.
- Wait a full three hours for a standard primer, or longer in coastal humidity.
Once cured, the wall has a tooth that grips the subsequent finish. Without this step, the chosen border pattern will not sit properly. The base coat simply makes the wall paint frame feel settled and true!
Marking the Frame Perimeter Accurately
The perimeter of a wall paint frame is a promise you make to the wall. If the line wavers, the illusion collapses. In Cape Town’s older homes, where plaster settles unevenly, I have learned to mark with a chalk line and a steady hand. Measure twice, because the eye forgives nothing once the brush is loaded.
The sequence matters more than confidence.
– Mark the centre point first, then work outward to maintain symmetry.
– Transfer measurements from the ceiling, not the floor, to keep the frame level.
– Snap the chalk line, then verify with a spirit level before cutting in.
Each mark is a boundary. When the tape aligns with those marks, the wall paint frame starts to feel inevitable. The border becomes a structure, not a decorative afterthought. Precision here earns its keep.
Taping Off to Achieve Crisp Lines
Taping off demands a particular temperament. The tape is only as honest as the surface beneath it. I press each strip into the corner with a plastic scraper, not my fingers, because body heat softens the adhesive and lets paint bleed under. The sequence is deliberate.
1. Lay the tape along the outer edge of your marked line first.
2. Burnish it down with firm, even pressure.
3. Score the edge with a fresh blade before painting.
That scoring step solves more problems than any expensive tape. When the wall paint frame needs a second coat, wait until the first is fully dry. Peel the tape back at a 45 degree angle, pulling toward the painted side. The line stays clean if the paint film breaks along the scored edge.
Applying the Frame Paint in Thin Coats
With the tape burnished and scored, the wall paint frame is ready for its first whisper of color. The instinct to load the brush like a kebab skewer is strong, but thin coats are the only route to a flat, professional finish. A thick layer will sag, pool, and peel like a sunburnt tourist in Durban.
Apply the paint with a lightly loaded brush, working from the tape edge outward. Let each coat dry completely before considering a second. For the best results:
- Use a 2.5cm brush for tight control
- Feather the edges to avoid buildup
- Wait at least two hours between coats
Two thin layers of your chosen colour will outlast any single heavy glop. Patience here pays off.
Removing Tape at the Optimal Time
Most painting failures occur after the brush has been put down. The tape removal stage of a wall paint frame is where the final edge is won or lost. Somewhere between wet and cured, there is a state called the tack phase, and that is the only time to lift the tape.
Leave the tape on overnight and the adhesive will bite into the paint film. Pull too soon and the paint will bleed under the edge. The window is narrow. In Gauteng’s dry winter air, it may be open for fifteen minutes. In Durban’s humidity, you might get an hour. The sheen level changes the timing too. A glossier finish takes longer to lose its tack, while a flat finish on your wall paint frame reaches the removal point sooner.
These conditions indicate the tape is ready to come off:
- no paint transfers to a cotton swab dragged along the edge
- the painted surface has a consistent sheen without wet patches
- the tape corners lift slightly on their own as the paint contracts
Once these signs appear, do not wait. Hold the tape and pull it back over itself at a 45 degree angle with a slow, continuous motion. A fast yank will stretch the tape and leave adhesive residue. Stopping midway creates a weak point where the tape can break. Pull away from the painted surface, keeping the tape folded back on itself. This directs the release force against the paint’s bond, so the wall paint frame keeps its clean perimeter.
The edge remains softer than the body of the frame for hours after removal. Any contact can dent it. Removal timing determines the longevity of the wall paint frame’s edge, and the extra minutes spent waiting are worth the difference between a sharp line and a fractured one.
Adding Texture or Glaze Effects
Most DIYers treat texture as an afterthought, but the wall paint frame offers a chance to embed depth into the surface.
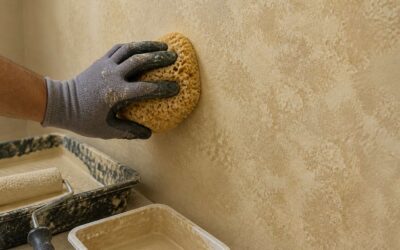
Start with a base coat cured for 24 hours. Mix a glaze medium with your tint, using four parts glaze to one part paint. Apply with a wide brush, working in sections under a square metre. Immediately drag a sea sponge or stiff comb across the wet surface. Here is the order that works:
- Roll on the glaze evenly.
- Stipple with a brush to break the surface tension.
- Wipe back with a damp cloth for a subtle grain.
Keep the glaze wet along the working edge. Dry patches will show as hard lines. I prefer to test on a scrap board first, because the absorbency of your plaster changes the final look. A wall paint frame with texture requires patience, not skill, and patience pays off!
Avoiding Common Mistakes
Preventing Bleed-Through Under the Tape
Bleed-through under the tape ruins the crisp edge of a wall paint frame. I have watched DIY enthusiasts press tape onto a wall without first wiping the surface clean. Dust and moisture break the adhesion. Another frequent error is applying paint too thickly near the tape line. The weight of the paint forces it underneath. A nearly dry brush and gradual coats prevent that.
Consider these common mistakes:
– Ignoring the tape’s manufacturer instructions for adhesion time.
– Skipping the final press-down along the edge with a putty knife.
– Pulling tape off while the paint is still tacky.
Each of these invites paint to seep into places it should never reach. A reliable painted border depends on respecting the tape’s boundary. That boundary deserves full attention.
Balancing Proportion with Room Size
Proportion is the silent negotiator in any room. A wall paint frame that suits a spacious lounge will suffocate a compact passage. One common mistake is measuring the wall in isolation, ignoring the sofa or bed beneath it. Another is repeating the same border width across different rooms, as if scale did not matter.
Consider the ceiling height and the distance from which the frame will be viewed. Large rooms tolerate bold, wide borders; small spaces need restraint. The frame should anchor the wall, not compete with it. Respect the room’s proportions and the frame will feel intentional rather than accidental.
Matching Frame Colors to Wall Undertones
The wall paint frame may look perfect on a sample board, but the moment it meets the wall, the undertone starts talking. A warm cream wall with hints of yellow will make a stark blue-grey frame look like an afterthought. A cool grey wall can turn an earthy terracotta frame muddy and dull. South African sun exaggerates these differences.
Common mistakes surface when people pick frame colours in isolation:
- Relying on a paint chip held against a white ceiling.
- Testing one coat without letting it dry to final sheen.
- Assuming a neutral grey frame works on every wall temperature.
Each mistake comes from treating the wall paint frame as an isolated shape. The frame’s colour must sit in the same temperature family as the wall, even if it is a different hue. A single test patch on the actual wall, left for a full day, offers honest feedback. Match the undertone, not the trend.
Refreshing Faded or Damaged Areas
Sun damage does not announce itself. It creeps across a surface until the wall paint frame looks patchwork. The first mistake is rushing to repaint without assessing the damage depth.
Visible cracks and dull spots need more than a quick dab. A common error is using leftover paint that has separated, which leaves a mismatched sheen.
- Forgetting to feather the edges of the old paint
- Applying a thick layer to cover a stain
- Ignoring the impact of humidity on drying time
Each choice creates a visible seam. The refreshed section must blend with the original texture. Sand the area lightly and wipe away dust before any new paint touches it.
Handling Uneven Wall Surfaces
An uneven wall will betray the finest wall paint frame before the paint dries. The eye reads the wobble in the boundary line first. Many South African walls, especially hand-troweled plaster, drift by several millimetres over a single metre. The common mistake is assuming flatness.
Assess the surface in raking light. Hold a torch parallel to the wall; the shadows expose every undulation. Then work with the geometry:
- Choose a straightedge that matches the frame’s length, not longer;
- Press the level into low spots to locate true high points;
- Mark the frame line from those high points so the wall paint frame follows the surface.
Ignoring this leaves the line floating over hollows, creating a shadow that reads as a curve. The surface always asserts itself. Respect its topography, and the frame will appear settled, intentional, and clean.
Caring and Maintaining Painted Frames
Cleaning Without Damaging the Paint
A painted frame looks flawless until the first fingerprint appears. The key to preserving a wall paint frame is consistent, gentle cleaning! A soft microfiber cloth with plain water handles most daily dust and smudges. For greasy residue, mix a few drops of mild liquid soap into a bowl of tepid water.
Aggressive scrubbing or solvent based cleaners will damage the paint surface, leaving permanent scratches or fading. I always advise homeowners to work from the top down, and to rinse their cloth often. This prevents dirt from becoming embedded in the paint.
- Wipe with light, overlapping strokes
- Blot stubborn spots rather than rubbing them
- Dry the frame immediately to prevent water marks
These habits keep your wall paint frame looking fresh without the need for frequent repainting.
Touching Up Scuffs and Scratches
A single scuff on a wall paint frame catches the eye faster than any crack in the plaster. In my years painting homes across South Africa, I have learned that scratches appear not from neglect, but from daily life. The solution is not to repaint the entire frame. It is to touch up the damaged spot with precision.
First, clean the area with a damp cloth and let it dry completely. Then, use a fine brush to apply paint directly to the scratch. Match the sheen and colour of your original wall paint frame. For deeper gouges, fill with a lightweight spackle before painting.
- Dab, do not stroke, to avoid building up paint
- Wait for the first coat to dry before deciding on a second
That process hides the repair without leaving a patchwork effect. Regular inspection of your wall paint frame catches small marks before they become permanent stains!
Protecting the Frame from Moisture
Moisture damages a wall paint frame quietly. In South African coastal towns, humidity settles into the timber and plaster behind the finish, causing blistering and peeling that appears only after the damage is done. A single rainy season can ruin a frame that took hours to paint correctly.
Protection starts with inspection. Run your finger along the edges where the moulding meets the wall and feel for rough patches or softness. Caulk any gaps immediately, but do not stop there. The topcoat needs to be water resistant while still allowing the surface beneath to breathe.
- Wipe condensation from kitchen and bathroom frames weekly.
- Ventilate rooms that trap steam after cooking or showering.
- Press gently on suspicious spots to locate hidden moisture damage.
A quality primer beneath the final colour gives your wall paint frame a lasting barrier against damp. That barrier keeps the edges crisp and the colour true, season after season.
Repainting or Updating the Design Over Time
The passage of seasons dulls the crispness of any wall paint frame. The once sharp edges soften under daily light and dust. Repainting requires observing the room’s current character. I find that sanding the original finish lightly, just enough to break the gloss, reveals the true texture of the moulding. Then, consider whether the existing hue still serves the room’s evolving mood. A shift in undertone, from a cool grey to a warm ochre, alters the entire perception of the room’s volume.
When updating, preparation dictates longevity!
1. Remove loose paint with a flexible scraper.
2. Sand the perimeter using medium grit.
3. Apply a bonding primer for the new topcoat.
4. Let each coat dry fully.
The chosen paint for the wall paint frame must match the room’s light exposure. Coastal glare fades darker pigments rapidly, so a satin finish with UV blockers offers longevity. Repainting every few years maintains the visual purpose without changing the structure of the frame itself.
0 Comments